Today’s inane images of the day will be scattered throughout the entry.
Sometime in late 2014, I was complaining to a current 3rd year about how slow my Macbook Pro [13-inch, Early 2011 model] had become. I like running ten to twenty Chrome browser tabs along with the whole Microsoft Office suite and FaceTime [so I can chat with Mike, of course] all at once. It doesn’t take a degree in computer science to know that this will inevitably slow down the performance of my laptop. Anyway, that genius 3rd year suggested that I look into upgrading my RAM and even went as far as to send me a link to the memory he purchased to upgrade his own laptop. After some hesitation [I really didn’t want to screw anything up!], I decided one frustrated evening when my laptop was operating at snail’s pace to just do it.
Oh my gosh, did my world change after I upgraded my memory. Suddenly I noticed that webpages and programs loaded 10x faster. It was almost as if I purchased a brand-new laptop!
I was waiting until after I graduated to post this entry on how to upgrade a Macbook’s RAM because I thought that the upgrade was in violation of AppleCare. Turns out that it isn’t – I visited the Genius Bar recently because I thought my battery was in need of a replacement [it wasn’t – it’s just me] and was informed by the lovely gentleman that upgrading my RAM would not void my AppleCare coverage. Whew [I switched my RAM back to the native sticks before going to the appointment, just in case… but turns out I didn’t have to waste my time]. Anyway, because of this newfound information, I decided that it was time to share the efficient-computing-speed-love with everyone [except those of you with Macbooks from 2013 and later… Apple soldered the RAM in, so it’s not as easily upgrade-able and this guide is absolutely useless to you – sorry].
So first off, what you need:
- Phillips #00 screwdriver or 1.4mm flathead screwdriver [I purchased the kit below because the Add-On price of this kit was cheaper than trying to buy a single Phillips screwdriver from Amazon – I used the 1.4mm flathead included in the kit]
- NOTE: I heard that the 2012 Macbook Pro models have a different kind of screw – please ensure you have the correct screwdriver by checking the backcover and seeing what shape the screws are before purchasing anything!

- Crucial 16GB Kit (8GBx2) DDR3/DDR3L-1600 MHz (PC3-12800) [There are a lot of types of memory out there – remember that you need 2 sticks to make it balanced, so don’t get distracted and buy the single 16 GB stick; the speed of this one at 1600 MHz works for the 2011 and 2012 models – at least I haven’t had any issues thus far and reviewers online have also recommended it.]

- Your Laptop [I didn’t think I needed a photo of this…]
Step-By-Step Instructions
- Back up your laptop’s hard drive [just in case!]. Even though it is highly unlikely anything will happen to your precious files, I always believe that it’s better to be safe than sorry!
- Turn off your laptop and discharge yourself of any static energy by touching something metal.
- Flip it over and remove the 10 screws holding the back cover.

Using the 1.4mm flathead screwdriver, I unscrew the 10 screws holding the back cover of my Macbook Pro. 
Here’s how tiny 7 of the 10 screws are! 
Do not be alarmed when you notice that 3 of the 10 screws are longer than the rest! 
Here are what all of the screws look like when they are taken out. Note: I actually lost one of the screws on my laptop and another one was loose so I purchased this set of screws to replace a couple of the originals.

Here’s what my laptop looks like with all of the screws out! - Take off the back cover.

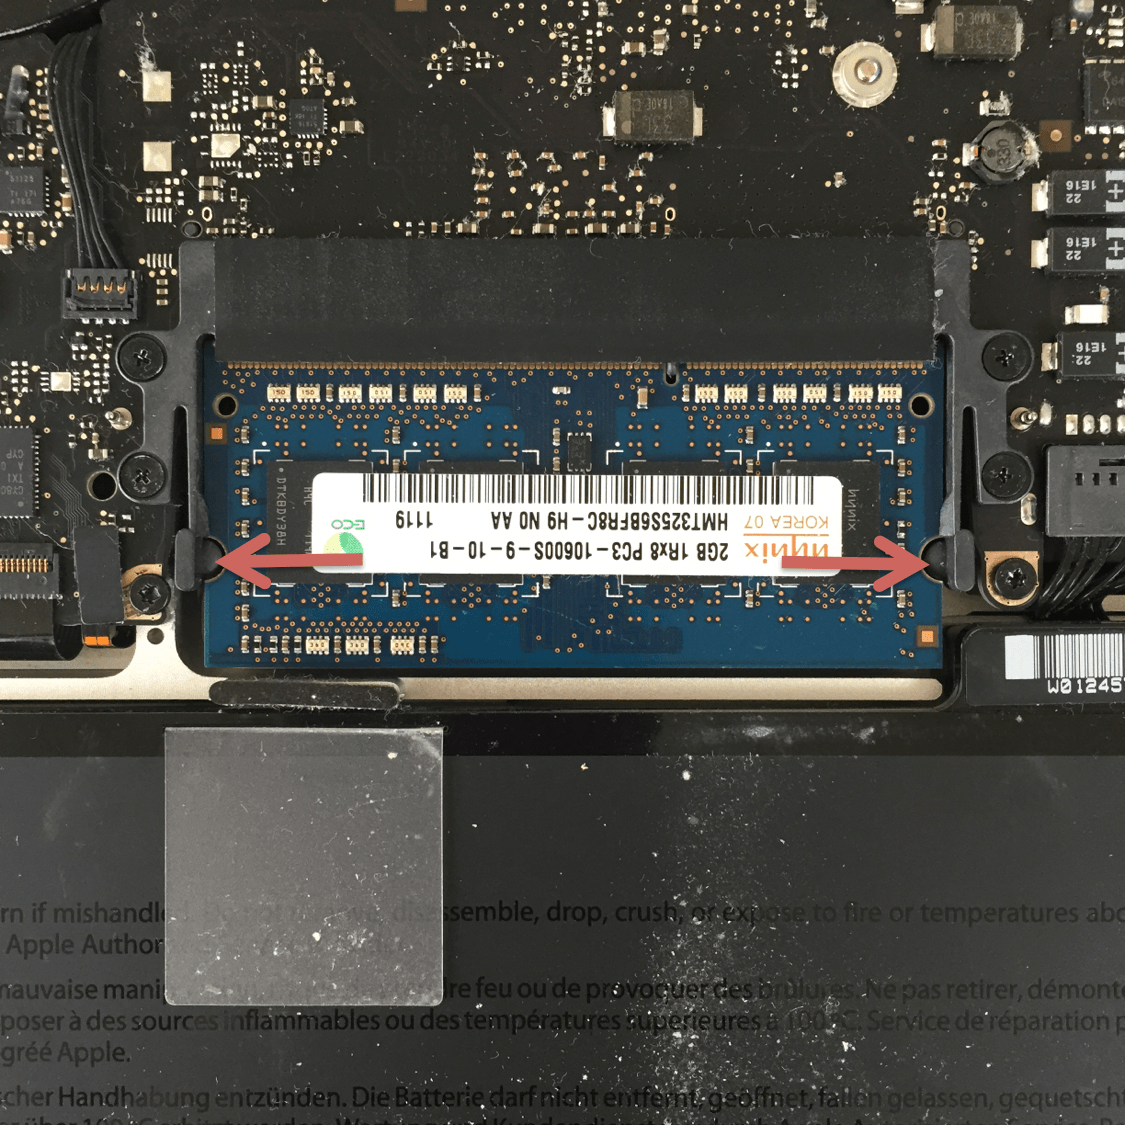
After you take off the cover, you will be greeted with this overwhelming sight. Focus your attention on the red rectangle. - Take out your native memory by applying gentle force along the two edges of the memory stick. The stick should pop out. You can use the two ridges to gently pull it out of the slot.

Apply gentle pressure to where the two red arrows are pointing. 
The stick will “pop out” like this. You can use the two ridges on the edges to pull it out. - Do the same for the second stick underneath.

After the first stick is removed, here’s what the second native stick looks like. Apply pressure to the edges the same way as with the first. 
Here’s what the second one looks like when it’s “popped out.” - Take one stick of your new memory and slide it into the slot at an angle. Press down on both edges until it “clicks” into place. Do the same for the second one.

After you have inserted the stick, press down on both edges closest to you until it clicks into place. Here is what the first stick looks like after it has been installed. 
Here’s what the second stick looks like when it’s placed in the slot, but not locked in yet. 
Example of where you should be applying gentle pressure to get the stick to click into place. I only had one hand, so imagine that I have another finger on the other edge and am pressing down on both until it is in place. 
New memory has been installed! Bird’s eye view of the laptop. - Place the back cover back on and put at least 2 screws back in on opposite corners of your laptop. Flip your laptop over to lift the lid and turn on your computer to ensure that you have installed your RAM correctly. After your laptop is on, check “About This Mac” to confirm that the computer recognizes the 16 GB of RAM.

Click on the Apple on the upper left corner of your screen. 
Click on “About This Mac” 
And something like this should pop up! Looks like it knows it has 16 GB installed! Success! - After confirming successful installation, close your lid, wait for your computer to be asleep and put the rest of the screws back in.


Congratulations! You’ve just upgraded your RAM!
Now, when I first did this, I actually turned on my laptop and found that the computer only recognized 8GB. I panicked and decided not to tinker around with it too much more. After some online research, I realized that I likely did not push my RAM stick in all the way, causing one of the two sticks not to be registered by the computer. So, I mustered up the courage to open the back cover again, take out the new sticks and re-install them. Second time around, I opened up my “About This Mac” and saw that it registered 16 GB. Woohoo!
If your laptop doesn’t turn on, or beeps, then chances are you didn’t install the memory correctly. Go back in and try again or if you’re concerned, take it to someone who has experience with this.
Hopefully this was helpful! Let me know if you have any questions!
P.S. Apple also has instructions on how to upgrade your RAM: https://support.apple.com/en-us/HT1270